Its a very easy two stitch pattern, a moss stitch I think its called, so it grows quickly and you can crochet and watch TV without having to concentrate too much or count stitches.
I tend to make my blankets a bit too large but Jessica has a great sizing reference guide for all blanket sizes and I chose a lap blanket to snuggle under while I'm reading over the winter months. The size is perfect and I'll be using her guide for all future blankets.
I had to grab snippets of time to work on it and Maria was close by, overseeing its progress. She's a strange cat; she hates to be held and she doesn't seek affection but all day everyday, she is about that far away from me regardless of what I'm doing :)
I did add a couple of extra elements to the original pattern. I added two rows of single crochet all around the blanket to give it a border and I also added some tassels which finish it off perfectly. Tassels are the bomb at the moment, so I thought I would share how I make mine. There's no need to purchase a fancy tassel maker, you can make them quickly and easily with what you have on hand.
So here we go:
Step 1: You will need your yarn and a sharp pair of scissors, and something sturdy to wind your yarn around like heavy cardboard, a plastic or tin lid or a quilting square. The size of your item will determine the length of your tassel so my DJ square was perfect for 5" long tassels.
Step 2: Starting and finishing at the bottom of the square, wind your yarn around and around until you are happy with the thickness of the tassel and make sure you count as you wind so you can keep them consistent in size. For my tassels I wound 40 times. Trim off the working yarn and then cut two extra lengths at about 12" each (no need to be particular, these are for tying the tassel).
Step 3: Slide one of the 12" pieces of yarn between the square and the front section of wound yarn and wiggle it up to the top of the tassel and knot it securely. Leave the tails as these will be used to attach the tassels to your project.
Step 4: Gently slide the yarn off the square and lay it on the centre of the remaining 12" piece of yarn about an inch or so from the top depending on how big you want the ball section to be.
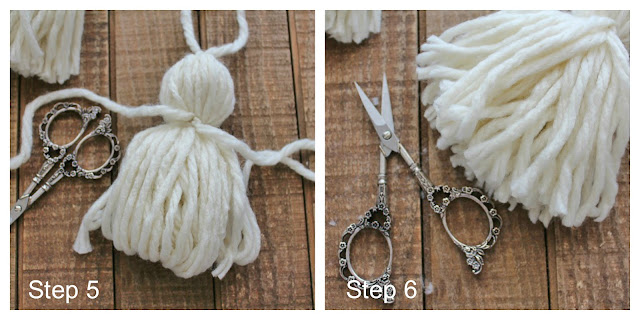
Step 5: Tie the yarn securely to form the ball and then smooth the tails down towards the bottom of the tassel, ready to be trimmed.
Step 6: With your sharp scissors, cut through the loops evenly at the bottom of the tassel and trim any longer pieces until you are happy that the tails are even (or "evenish" in my case).
And that's it! Super simple and no need for fancy tassel makers :) To attach, I tied mine to each corner of the blanket and then sewed in those tails. They give the blanket an elegant finish and I love them ♥ I think I actually prefer these to pom poms :)
And Maria gave them her stamp of approval. I left the blanket for two minutes during the photo shoot and she immediately claimed it, snuggled down and had no intention of moving :)
I do love my new blanket and I imagine Maria and I will use it a lot over the winter, her more than me most likely. Its the perfect size, the perfect texture and that gorgeous chunkiness will warm those chilly nights. It looks pretty inviting doesn't it? :)
Happy crocheting :)


No comments
I hope you enjoyed your visit to my blog. I love hearing from you so thank you for taking the time to leave me a message. 😊