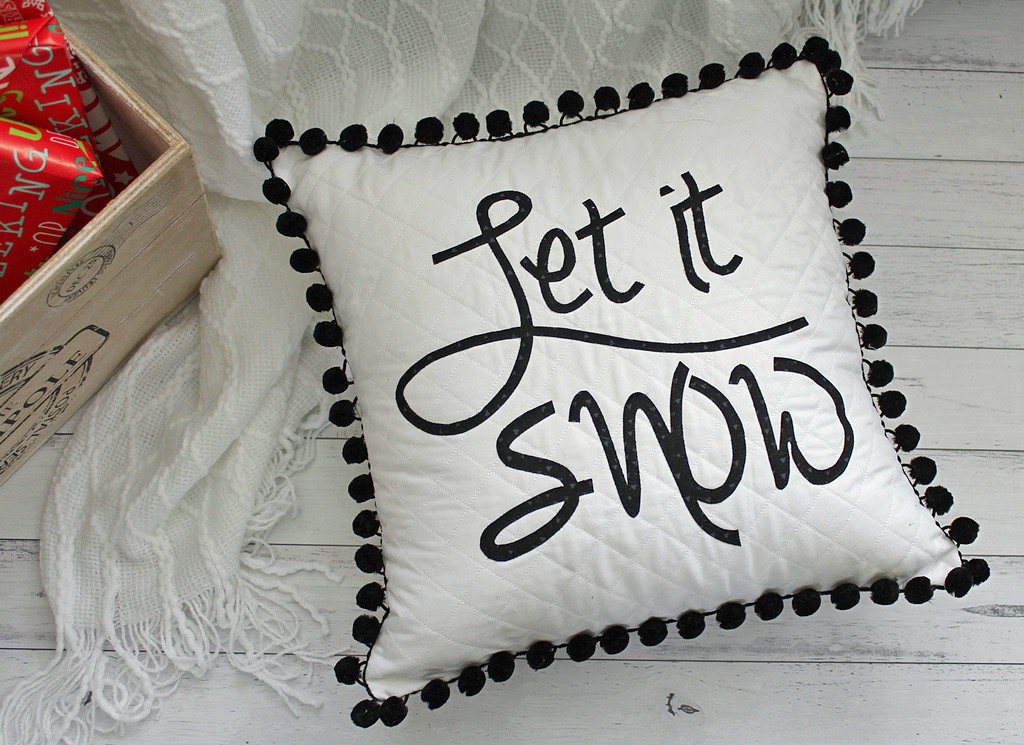
To us it looks so magical, but I'm sure living with it for months is not as romantic as it appears to be in the Hallmark movies :) Regardless, I'm leaving a little plea under our tree this year... Santa please Let it snow!
I think Santa should see my plea, don't you? I'm not hopeful my wish will be granted; I'm still waiting for the pony I asked for when I was eight ;) Maybe my wishes were a little grandiose? Maybe I was on the naughty list that year? But in all seriousness, I wrote it in BIG letters this time so surely he can't miss it, can he? ;)
OK enough pouting, let's talk about my cushion:
I whipped this cushion up over the weekend and I wasn't sure where I was going with it so I didn't take step by step photos for you but I thought I'd share my process, my templates and a few little tips and links so you can recreate your own Let It Snow Cushion.
You know I love typography, so the cursive lettering was an easy choice for my cushion. The lettering is secured using the quick and easy raw edge applique method, and the cushion front is quilted first with some lovely cross hatching; no stopping and starting around the letters or billions of threads to bury (YAY).
So here's a basic run down on how I made my Let It Snow Cushion:
- Cut 1 x 16 1/2" square of white homespun and 1 x 16 1/2" square of iron on pellon. Fuse the pellon to the back of the white square with a hot iron to prepare your cushion front. You could also use a light weight wadding if you prefer.
- Cut a 18 1/2" square of lining fabric. Press the square and lay the cushion front on top right side up, pin basting the three layers together ready for quilting.
- With a hera marker, mark two diagonal lines from corner to corner to create an "X" on the cushion front. These will be your first quilting lines.
- With your walking foot attached, sew on the marked lines first and then at 1" intervals in both directions, to cross hatch quilt the cushion front. There is a great tutorial HERE for cross hatching and it shows you how to use the guide attachment on your machine or how to mark your sewing lines with a hera marker or chalk.
- Trim away the excess lining fabric level with the cushion front.
- Download my Let It Snow Cushion applique templates HERE. The applique design has been reversed for your convenience. Print the lettering templates.
- Using a light box or sunny window, trace the lettering onto vliesofix (or equivalent) with a pencil. Fuse the vliesofix to the wrong side of your chosen black fabric with your iron.
- Cut around the letters and arrange them on the cushion front as shown in the photos. When you are happy with their placement, remove the paper from the back and fuse them into position with a hot iron.
- With matching thread, sew around the lettering, about 1/8" from the edges to secure them in place. There is a great tutorial HERE for raw edge applique.
- You will need 2 metres of the black pom pom trim.
- Lay the trim along the raw edge of your cushion front, pom poms facing towards the middle of the cushion and the tape along the raw edge. Hold in place with pins or wonder clips, bending the tape into a curve at the corners and trimming away any excess.
- Attach a zipper foot to your sewing machine and move your needle to the left so you can sew close to the pom poms. I used a 1/2" seam allowance - you want to sew as close as you can to the pom poms to hide the tape.
- Sew the tape to the cushion front, being careful to not sew over the pom poms (or your fingers). There is a great tutorial HERE for adding pom pom tape to a cushion.
- To make the cushion back, I chose the simple envelope method but you could also add a zipper. There's a great tutorial for adding zippers HERE, just disregard the binding instructions.
- For the envelope method: cut 2 x 16 1/2" x 12 1/2" rectangles. Fold over 1/2" along one long edge of each piece and press. Fold over another 1/2" along the same edge, press and top stitch to secure. This should give you a 3" overlap on each piece to hide the cushion insert.
- Lay the backing pieces on top of the cushion front, right sides together and overlapping the envelope folds. Hold into position using wonder clips or pins.
- Sew around the cushion using the zipper foot and a 1/2" seam allowance.
- Clip the corners. Turn the cushion to the right side and add a cushion insert to complete your Let It Snow Cushion.
So that's how I made my little cushion. I hope I've given you enough tips and resources to recreate your own version, and of course you can always adapt it to suit your needs. You might prefer hand quilting the cushion front after attaching the applique or you might prefer to blanket stitch applique the lettering...the choice is yours.
I hope you enjoy sewing this little cushion and I really hope Santa reads my blog. I need him to know I'm deadly serious this time; please Santa...Let It Snow!
Happy quilting :)


No comments
I hope you enjoyed your visit to my blog. I love hearing from you so thank you for taking the time to leave me a message. 😊