Classic Quilt Blocks have been sewn for centuries, are easy to recognise and are every quilter's favorite. Let's celebrate these gorgeous blocks and add them to our quilting projects!

Happy Friday lovely! I'm so thrilled you're loving this month's block and you're planning to sew with me in the sew along. Some of you have sent photo's or tagged me to come see your colour palette's and a few blocks you've made - I love seeing what you're sewing and a sew along is a great way for me to connect with you, especially during Covid!
I really appreciate those who shared the sew along on social media with their friends, I've met some wonderful new quilters and I'm so happy to have you visit my little blog.

Last week was all about planning our quilts, choosing our fabrics, and sewing a test block. I've seen some wonderful combinations in a wide range of prints - from vintage to super modern and they all look stunning!
In this week's PDF instalment, I've included a checklist of things I think are important before you embark on any new project, a cutting checklist for the entire quilt and a checklist of block combinations - a little help so everything runs smoothly for you! Are you ready to sew?

I had a little helper in the sewing room - I'm pretty sure she loves fabric more than I do ;) As you can see, I mix and matched fabrics from my stash to make these blocks. Some fabrics are from forever ago and some are from my Bonnie and Camille stash. I tried not to think too hard about it, just cut, sew, press, and repeat.
Since there's only sixty-four blocks, it doesn't take long to get them all sewn, and I enjoyed watching the pile grow block by block.
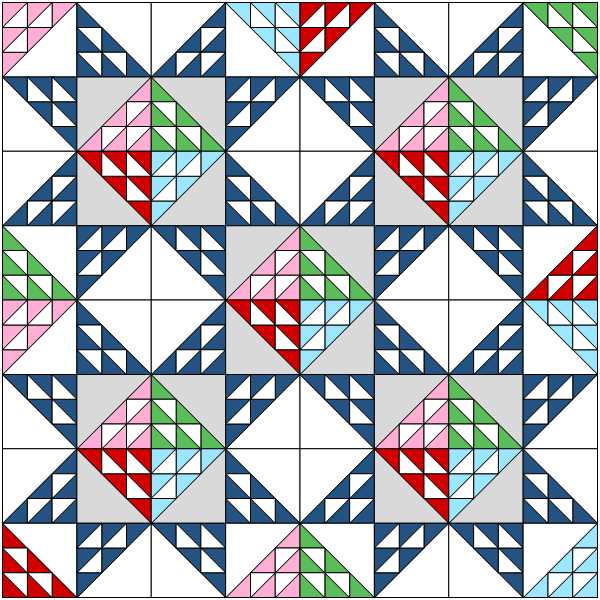
I choose two colours for the background (white and light grey), and I went back and forth on this decision a lot. It looks great with either one or two backgrounds, but I wanted to define those stars and the light grey seemed to do that.
Eventually I decided to go with my first instinct and commit to the two backgrounds, and I'm so glad I did:

Here's my blocks roughly laid out, and I love the warmth the light grey adds to the quilt. If you're on the fence about adding a second background, then seeing this might help you decide. You could try another colour or even a low volume fabric for some extra visual interest.
I'm the worst at laying out scrappy blocks. I can move them around all day and still get two of the same prints together - it's my superpower! ;) I tried not to over think it or move things around too much and I found a combination I was happy with.

My blocks are ready to be sewn into a quilt top, and notice the post it notes and basting pins holding the blocks in each row together? I'm not fancy, I just grab whatever is handy. It's very important to keep these blocks in the correct orientation, and this is what works for me.
Next week I'll give you the final instructions for constructing the quilt top, or you can sew ahead using any of the diagrams I've provided. I'll also include some ideas for borders if you want to add them, plus a list of requirements for finishing the quilt.
So, all you need to do this week is download Week 2 of the Scrappy Birds In The Air Sew Along and start cutting and sewing all sixty-four blocks required for this quilt. Exciting! Simply click the link to grab your file:

And that's it for this week. Take your time, enjoy the process and sew some gorgeous blocks. I hope I'm making this a fun quilt to sew and it offers you a little distraction from Covid - we all deserve one!

Happy quilting :)


I'm so happy that I stumbled onto your blog thanks to Pinterest. The quilt is stunning and thanks for the sew along!
ReplyDeleteI'm happy to have you here :) Have fun with the sew along. It's been so fun to put together and the quilt is gorgeous :)
DeleteI recently read a book revolving around quilts during civil war. And wanted to make a birds in the air quilt. Pleasantly surprised to find your blog and excellent tutorial. Thank you.
ReplyDeleteI'm thinking of using milestones fabric by Kansas troubles. Hoping it would look neat to era.
You're welcome! I hope it helps with your quilt :)
Delete